This is the second part of the series of blog posts showing how to integrate Power BI with Azure DevOps, a cloud platform for software development. The previous post gave a brief history of source control systems, which help developers manage code changes. It also explained what Git is, a fast and flexible distributed source control system, and why it is useful. It introduced the initial configurations required in Azure DevOps and explained how to integrate Power BI (Fabric) Service with Azure DevOps.
This blog post explains how to synchronise an Azure DevOps repository with your local machine to integrate your Power BI Projects with Azure DevOps. Before we start, we need to know what a Power BI Project is and how we can create it.
What is Power BI Project (Developer Mode)
Power BI Project (*.PBIP) is a new file format for Power BI Desktop that was announced in May 2023 and made available for public preview in June 2023. It allows us to save our work as a project, which consists of a folder structure containing individual text files that define the report and dataset artefacts. This enables us to use source control systems, such as Git, to track changes, compare revisions, resolve conflicts, and review changes. It also enables us to use text editors, such as Visual Studio Code, to edit the artefact definitions more productively and programmatically. Additionally, it supports CI/CD (continuous integration and continuous delivery), where we submit changes to a series of quality gates before applying them to the production system.
PBIP files differ from the regular Power BI Desktop files (PBIX), which store the report and dataset artefacts as a single binary file. This made integrating with source control systems, text editors, and CI/CD systems difficult. PBIP aims to overcome these limitations and provide a more developer-friendly experience for Power BI Desktop users.
Since this feature is still in public preview when writing this blog post, we have to enable it from the Power BI Desktop Options and Settings.
Enable Power BI Project (Developer Mode) (Currently in Preview) #
As mentioned, we first need to enable the Power BI Project (Developer Mode) feature, introduced for public preview in the June 2023 release of Power BI Desktop. Power BI Project files allow us to save our Power BI files as *.PBIP files deconstruct the legacy Power BI report files (*.PBIX) into well-organised folders and files.
With this feature, we can:
- Edit individual components of our Power BI file, such as data sources, queries, data model, visuals, etc.
- Use any text editor or IDE to edit our Power BI file
- Compare and merge changes
- Collaborate with other developers on the same Power BI file
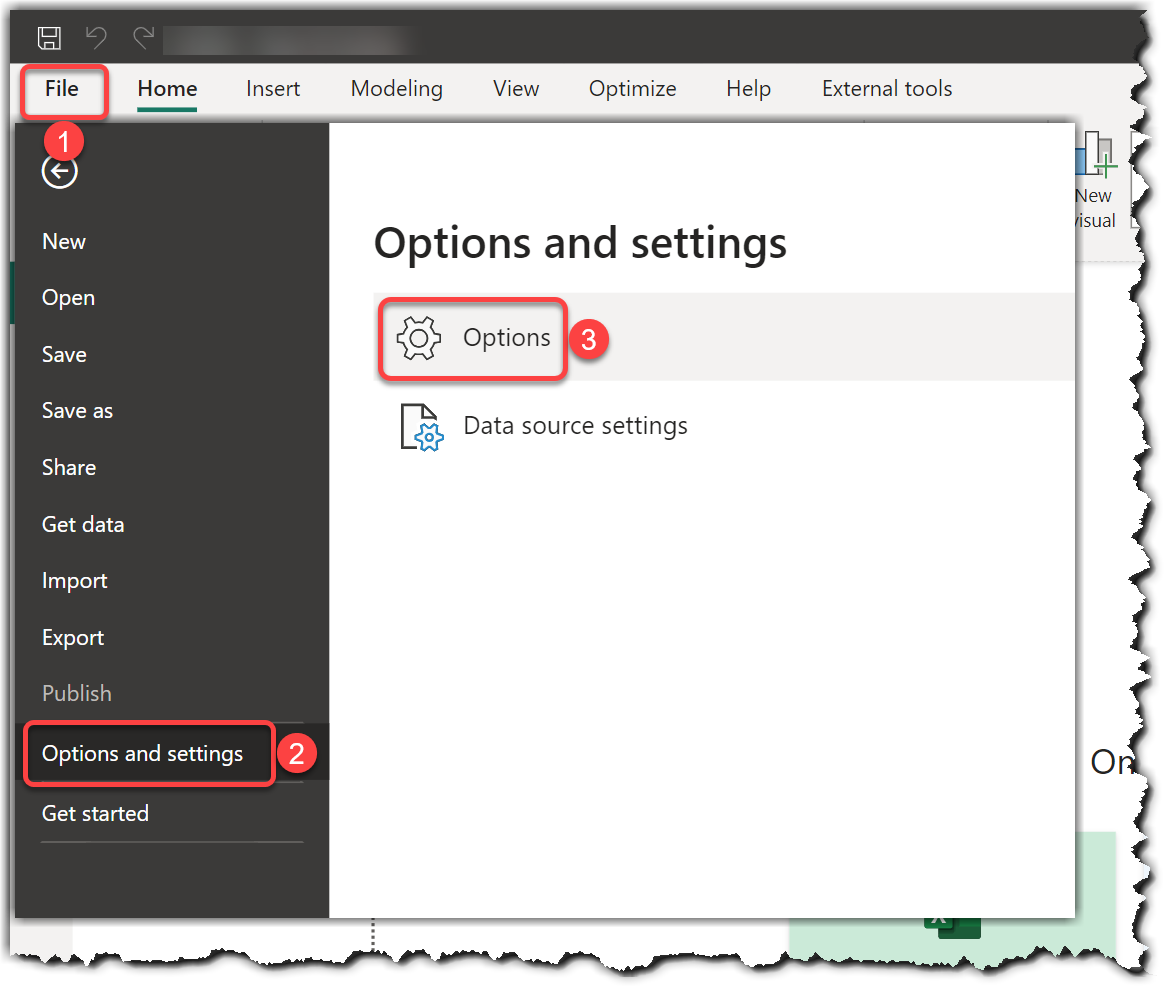
To enable Power BI Project (Developer Mode), follow these steps in Power BI Desktop:
- Go to File
- Click Options and settings
- Click Options
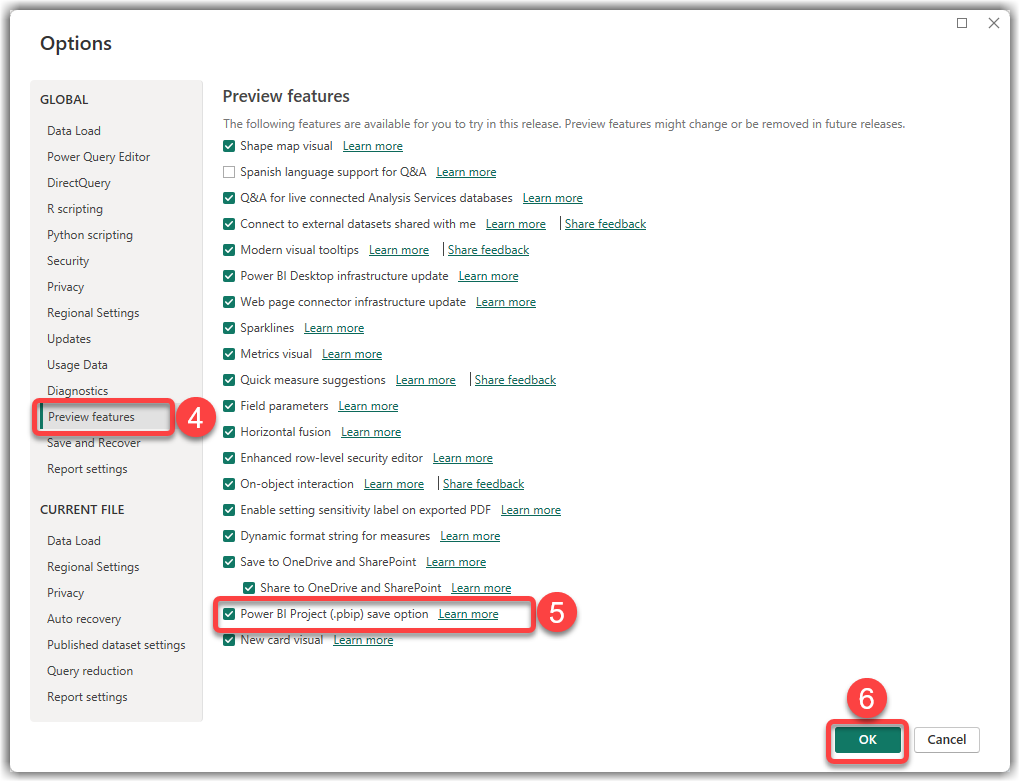
- In the Options dialog box, go to Preview features
- Check the box next to Power BI Project files
- Click OK
After applying the changes, we need to restart the Power BI Desktop.
Clone the Git repository on your local machine using VS Code
The first post of this series explained how to create a new Organisation, Project, and Repo in Azure DevOps. So, we do not repeat those steps here. Instead, this section explains how to clone our Git repository created on Azure DevOps on the local machine. Cloning is the process of copying a remote repository to a local machine so that we can work on the project offline.
To clone a Git repo on a local machine, we require either to install Visual Studio or Visual Studio Code (VS Code) on the local machine. We can also use Git Command Line for cloning. The latter is out of the scope of this blog, so we focus on using the VS Code methods.
Note
Regardless of the desired cloning method, we have to install Git on the local machine.
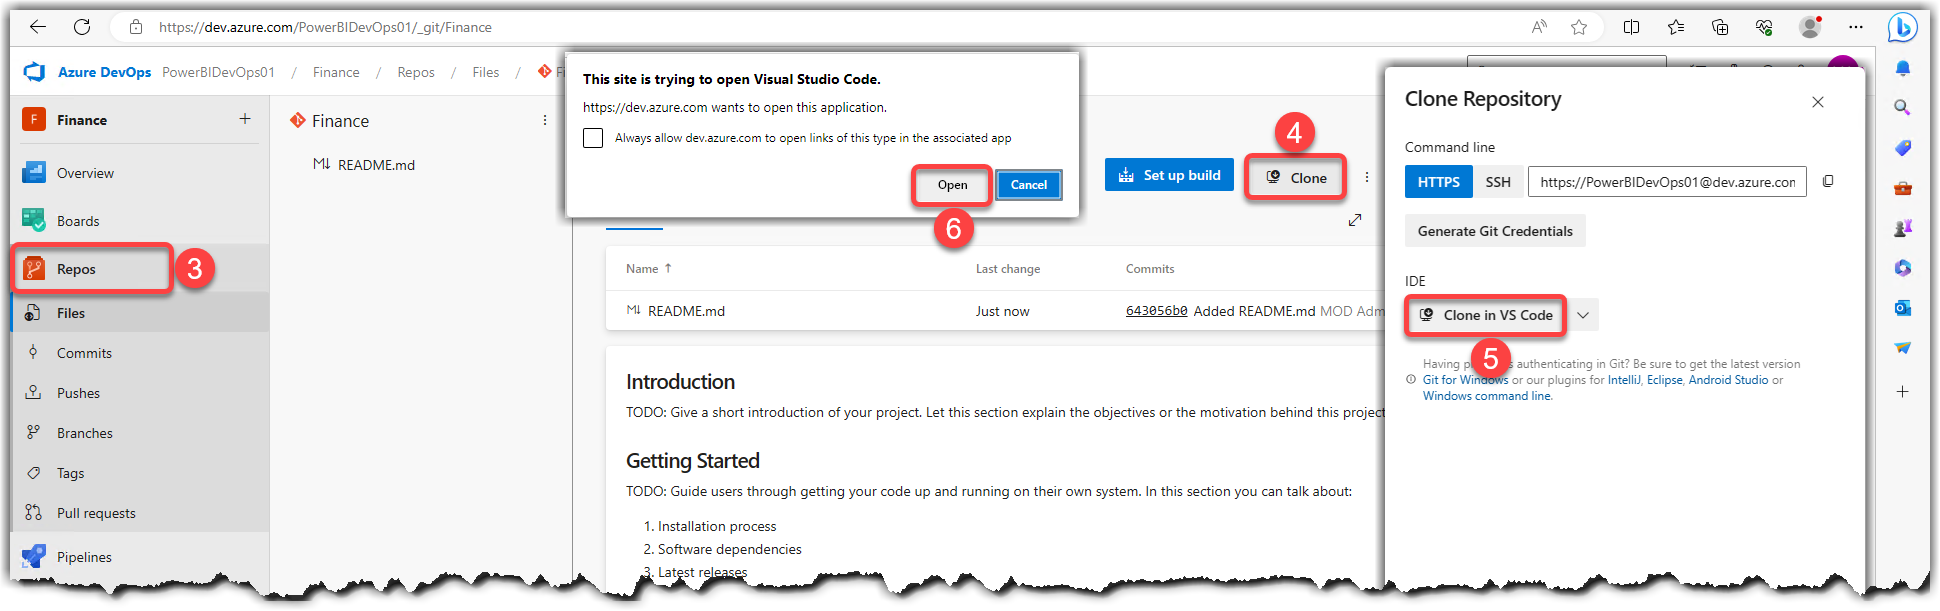
Follow these steps to close Azure DevOps Repos with VS Code:
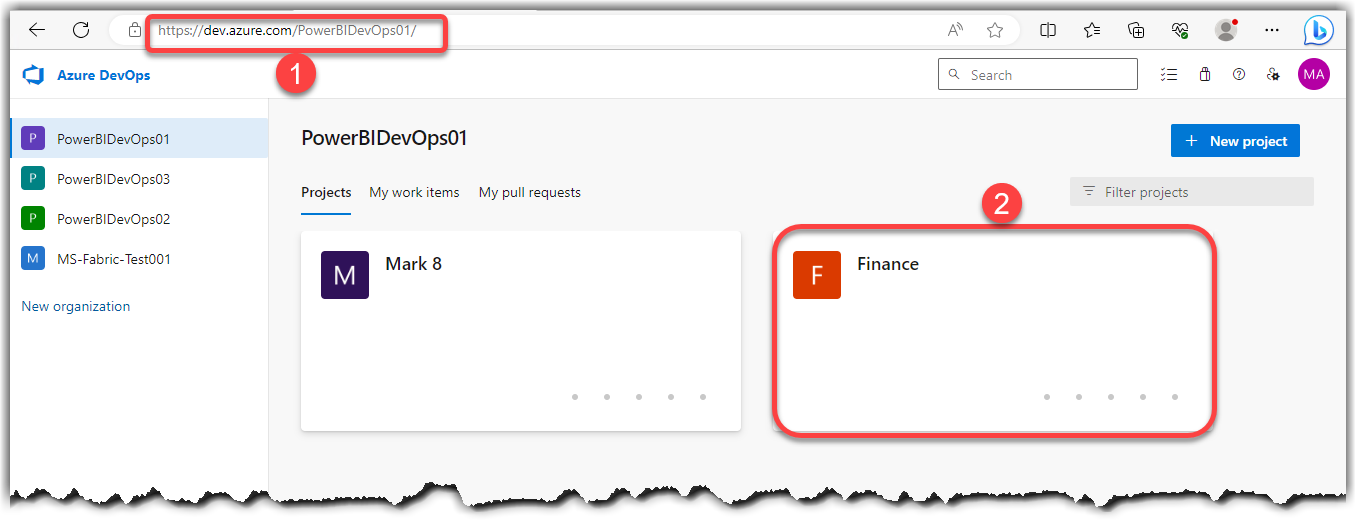
- In your web browser, navigate to your Azure DevOps Organization using this pattern: https://dev.azure.com/{your_organization_name}
- Click the desired Project
- Click Repos
- Click the Clone button
- From the Clone Repository pane, click the Clone in VS Code button
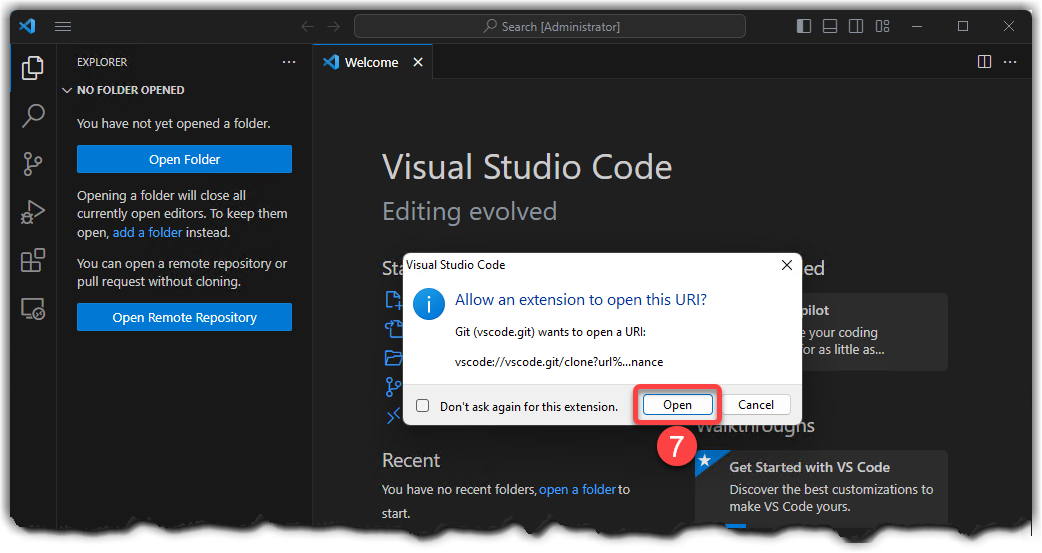
- Click the Open button
- Now you get a message on VS Code to Allow an extension to open this URL; click the Open button
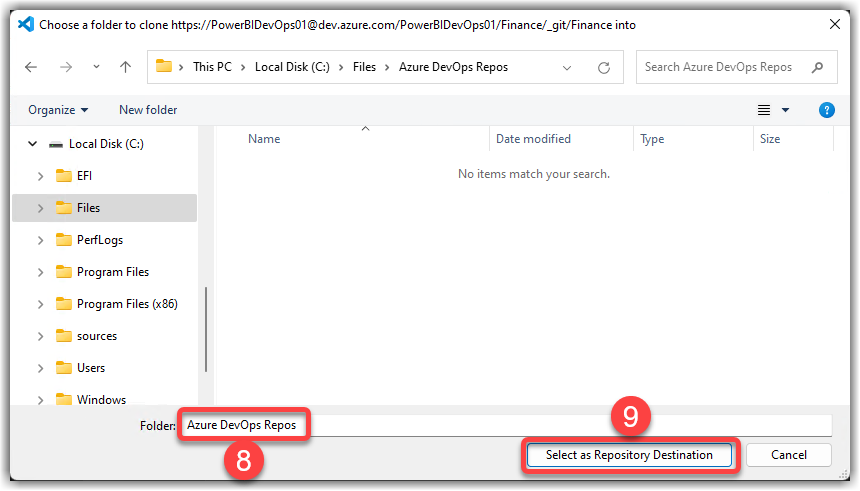
- Select a Folder to clone files
- Click the Select as Repository Destination button
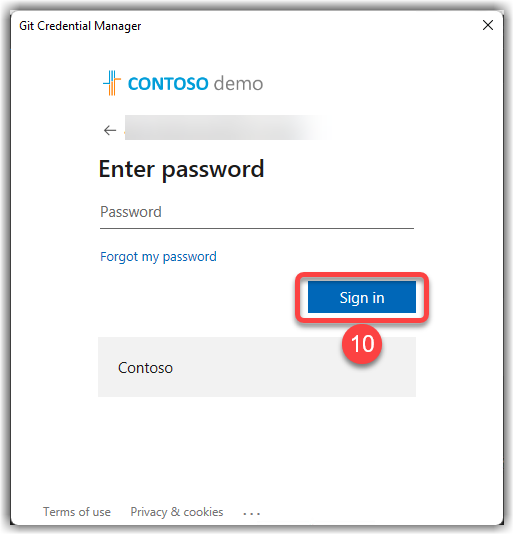
- Pass your credentials on the Git Credential Manager and click the Sign in button
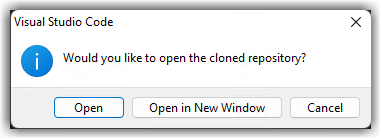
We are done now. You can click either the Open button to navigate to the selected cloned repo within the VS Code or click the Open in New Window button to open a new instance of VS Code and navigate to the cloned repo.
So far, we have cloned an Azure DevOps repo with VS Code. The next step is to create a Power BI Project.
Create a Power BI Project #
The next step is to create a Power BI Project using Power BI Desktop. You can either create a new project from scratch or convert an existing PBIX file into a Power BI Project file (PBIP). In this blog post, I create a new file from scratch.
To create a Power BI Project file, follow these steps:
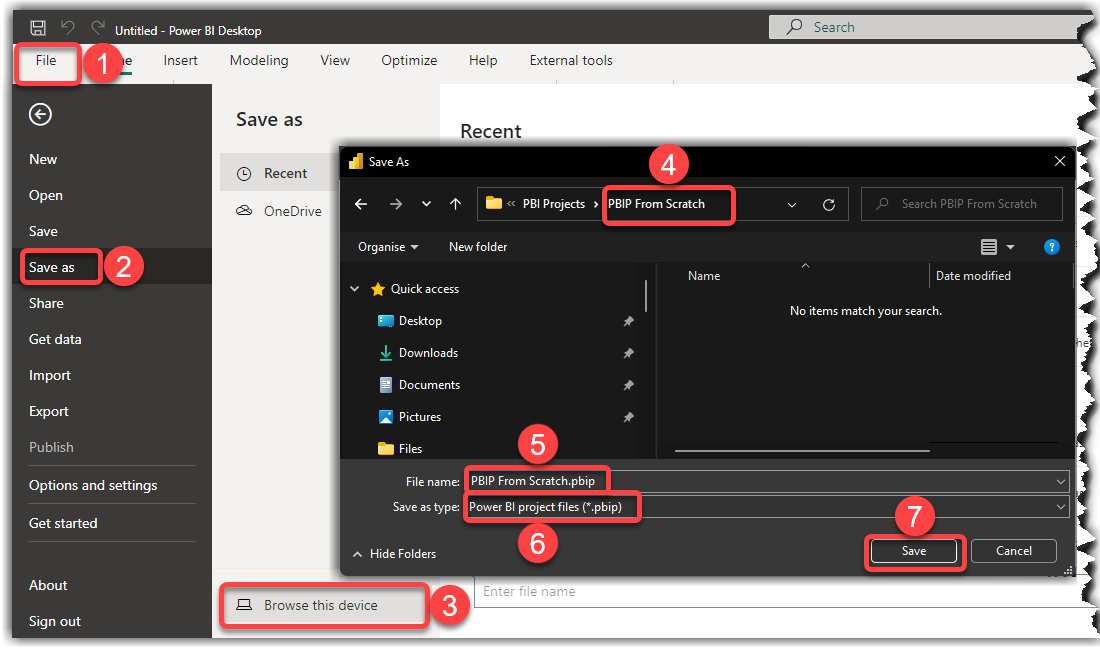
- Open a new instance of Power BI Desktop, then click the File menu
- Click the Save as option
- Click the Browse this device
Note
You may want to save the project in your OneDrive. In that case select the OneDrive option on the Save as menu.
- In the Save As dialog box, choose the location of the cloned Azure DevOps repo
- Type in a name for your file
- In the Save as type drop-down list, select the Power BI Project files (*.pbip) option
- Click Save
When we navigate to the location where we saved the project, we will see that the folder contains the following:
- The PBIP From Scratch.pbip file
- A PBIP From Scratch.Dataset folder
- A PBIP From Scratch.Report folder
You can explore and edit these folders and files using Power BI Desktop or any other tool of your choice such as Tabular Editor or even a notepad editor such as Notepad++.
Now that we created the Power BI project, let’s carry on and create a simple data model and report.
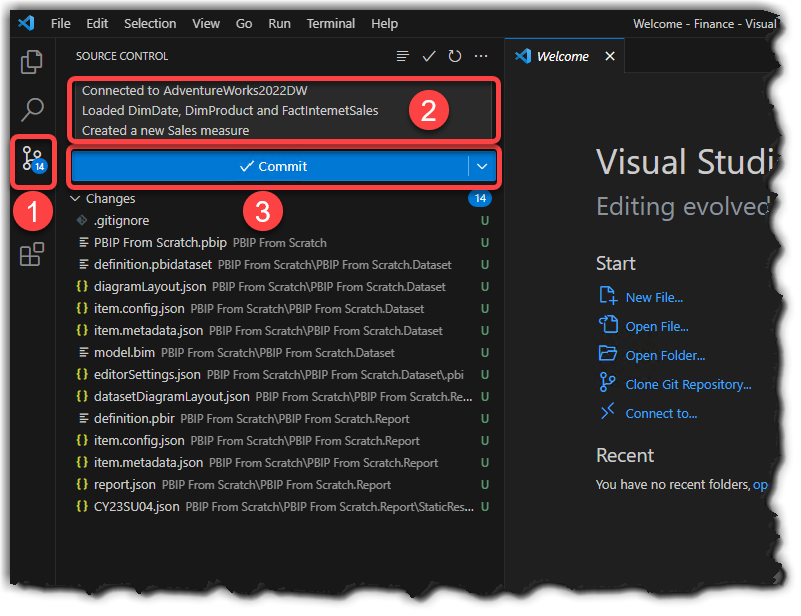
Since this is just a simple test, we can connect to any data source of choice, I use Microsoft’s SQL Server sample database: AdventureWorks2022DW.
In my sample, I get data from the following tables:
- DimDate
- DimProduct
- FactInternetSales
I also created a new measure as below:
Sales = SUM(FactInternetSales[SalesAmount])Then I created a simple report with a slicer and a line chart as follows, and I saved the changes locally on my machine:

Now on VS Code:
- The Source Control pane detected a couple of changes
- To commit the changes we enter a comment that explains what we have done
- Click the Commit button to commit the changes to Azure DevOps Repo
Depending on your VS Code settings, you may get the following message on VS Code saying “There are no staged changes to commit. Would you like to stage all your changes and commit them directly?” as shown in the following image. This question asks you if you would like to Stage all changes first, and then Commit them locally. Learn more about Staging changes and Committing here.
I select Always as I don’t want VS Code to ask the same question again in the future.

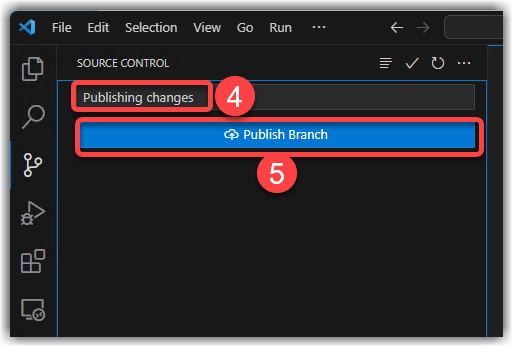
So far, we committed changes to our local machine, we now want to publish the changes to Azure DevOps.
- Type in a comment
- Click the Publish Branch button
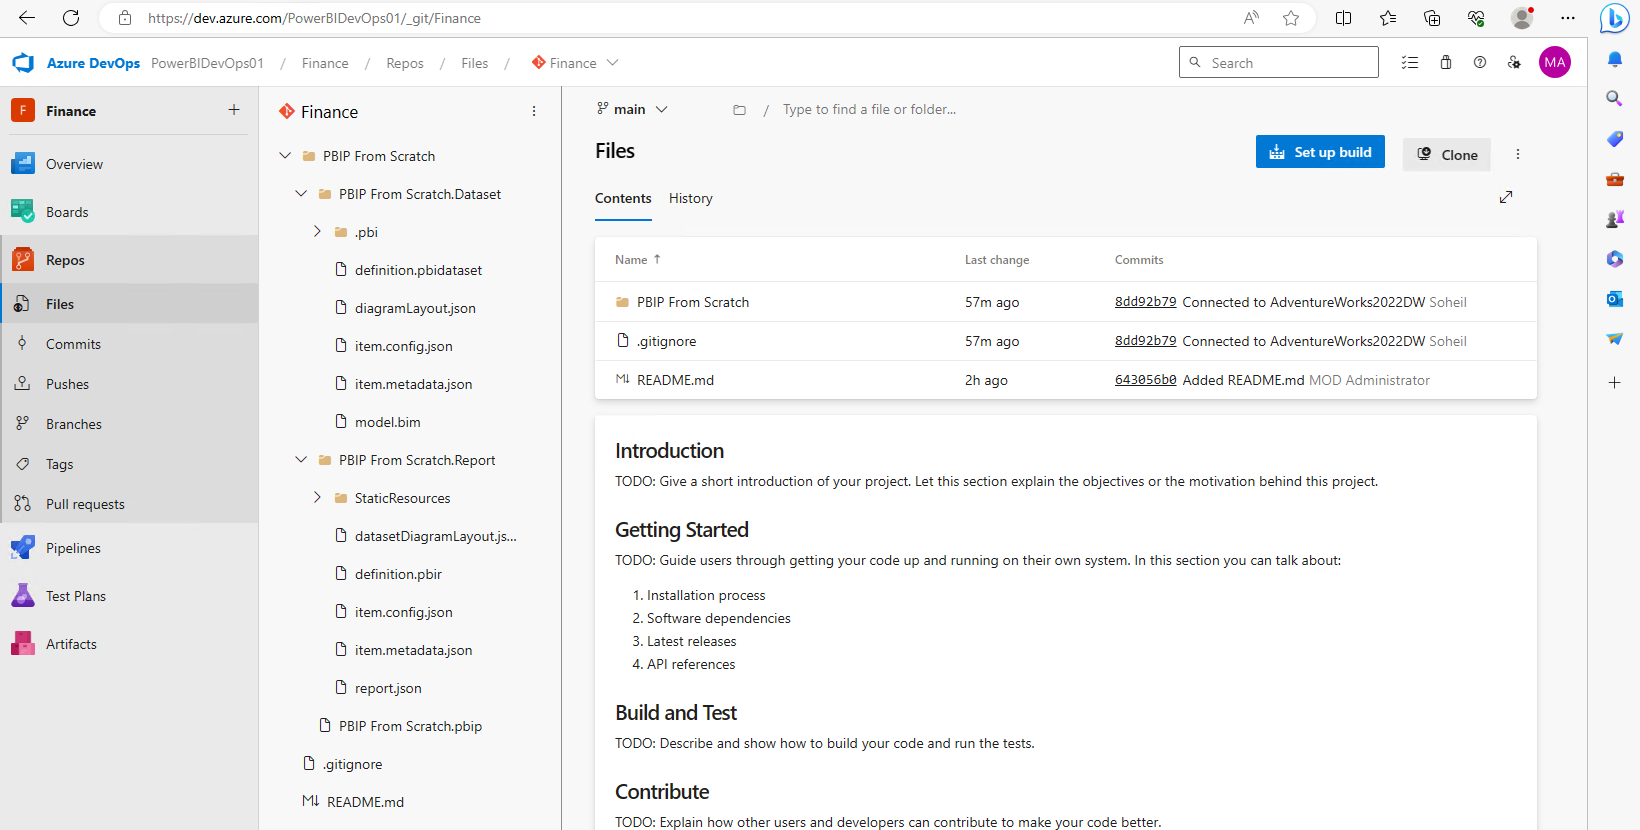
Check Azure DevOps Repo for Changes
Now, we successfully Pushed all changes to the Azure DevOps repo. The next step is to check the DevOps repo. Checking if the changes have gone through on Azure DevOps is easy. We just need to navigate to the desired Project on Azure DevOps.
Check Fabric Workspace for Changes
Log into Fabric and navigate to the desired Workspace. If you correctly configured Git Integration from the Workspace Settings, you should see that the Workspace contents synchronised with the Azure DevOps repo.
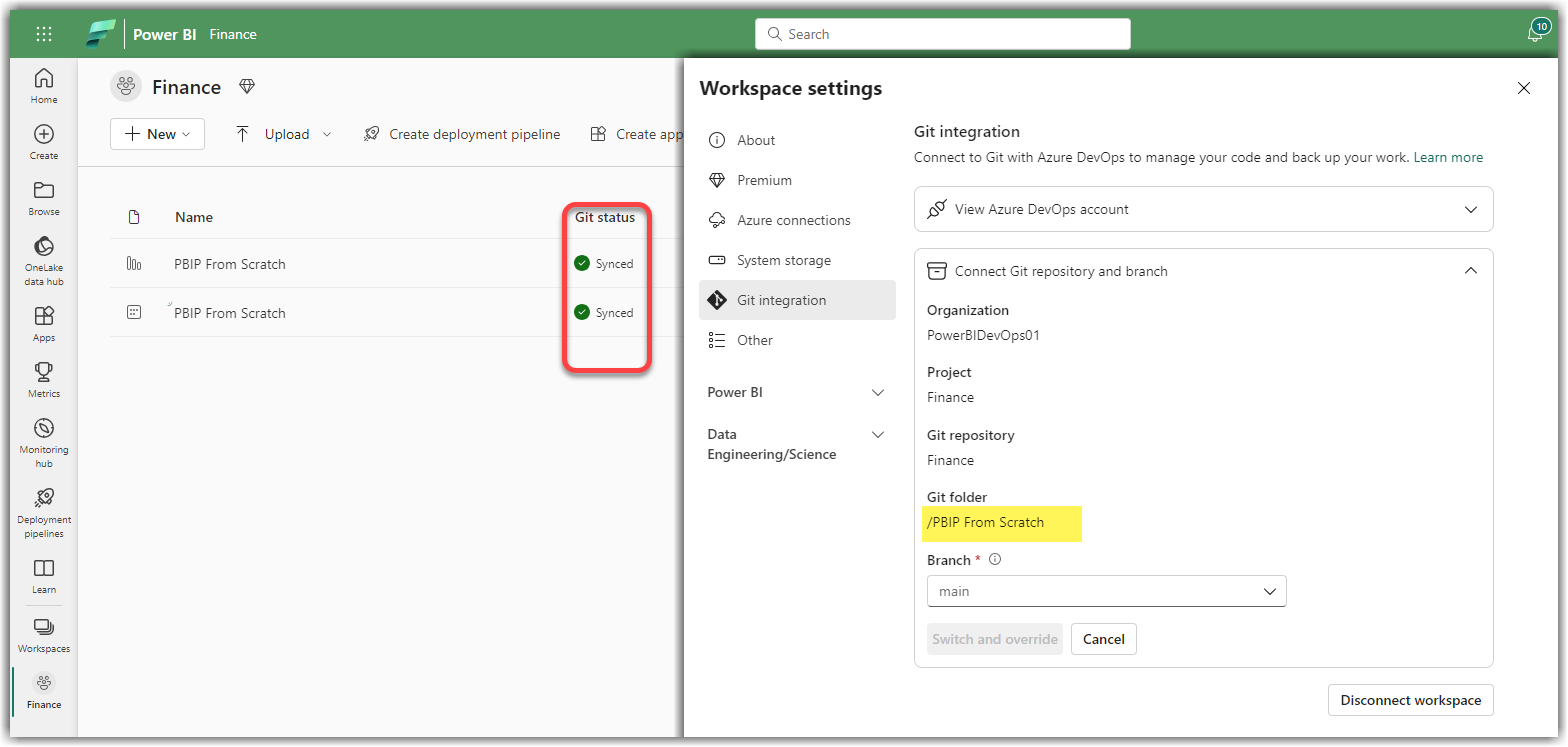
As you see, in my case, the synchronisation was successful. Now, let’s open the report and see if it is actually working.
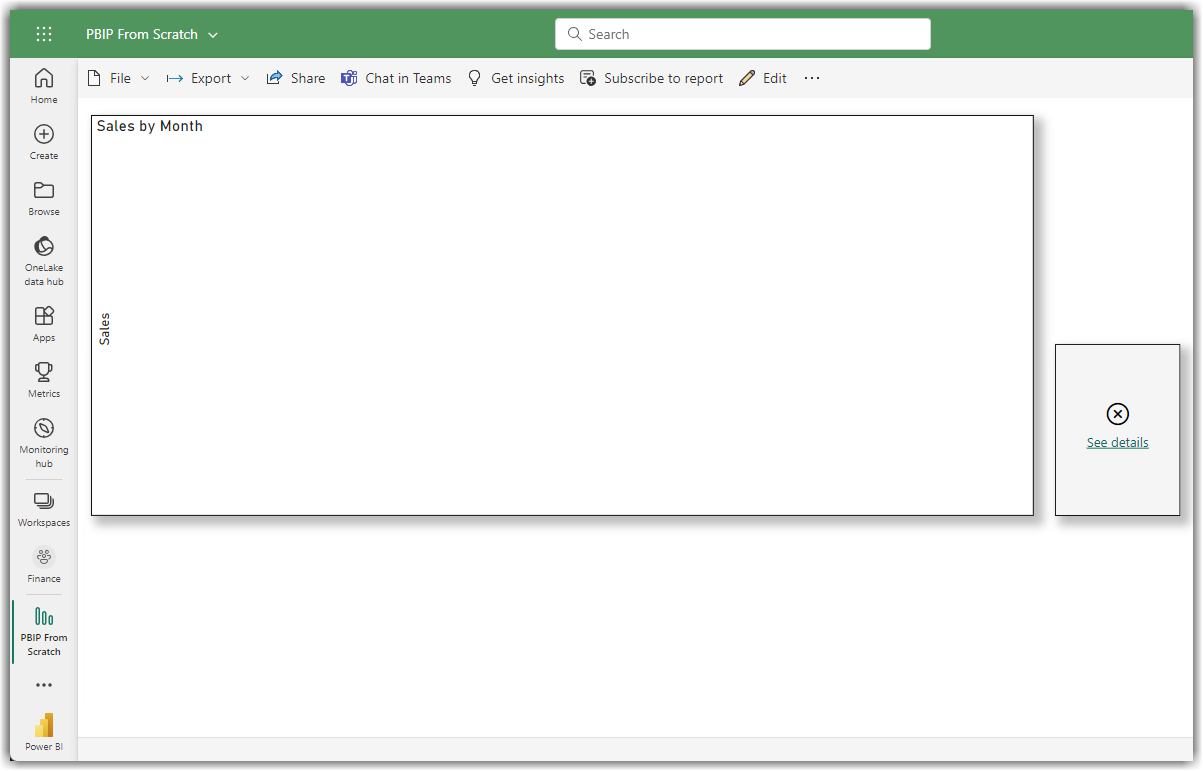
As you can see, the report is empty. This is because the Git integration in Fabric only synchronises the dataset and report definitions, not the data. Therefore, we have to either refresh the dataset or Publish the report to Fabric from Power BI Desktop.
Note
Since we work on a Power BI Project, if you use older versions of Power BI Desktop than the Aug 2023 release, the Publish button is disabled.
This is it for this blog post.
In the next blog, we look at some real-world working scenarios and discuss current limitations and considerations.
So stay tuned for that.
As always, I would love to know your opinion and thoughts. So please share with us what you think in the comments section below.
Discover more from BI Insight
Subscribe to get the latest posts sent to your email.
Thanks for this lovely blog, What are the licensing requirements in terms of AZURE DEVOPS GIT, considering we are a team of 8 developers, what DEVOPS git license we need
Thanks
Hi Zahid,
I’m glad to see you find this post helpful.
Re. licensing, please check this out:
https://azure.microsoft.com/en-us/pricing/details/devops/azure-devops-services/
Hi,
thank you for all of the clear explanations. In my organization, the question still remains of how this git integration interacts or not with deployment pipelines. Could you shed some light on this topic?
Hi Guillermo,
Thank you for your kind words and the question! I’ll be covering the topic of how Git integration relates to deployment pipelines in my next blog post. Stay tuned for a more detailed exploration of this topic in the upcoming post. If you have any more questions or specific aspects you’d like to know about, feel free to reach out.
Cheers.
Thank you for this informative blog post on integrating Power BI with Azure DevOps, specifically focusing on local machine integration. Power BI Project (Developer Mode) seems like a promising feature for developers, allowing better collaboration and source control for Power BI projects. Your step-by-step guide is very helpful for those looking to set up this integration.
You’re very welcome, Dennis!
I’m happy to hear that you found the blog post informative and helpful. If you have any questions or need further assistance, feel free to ask.
Happy integrating!
Hi,
Very nice article.
Looking forward to some hands-on with power bi desktop integrated with Azure Devops.
Please write something for Git integration related to deployment pipelines.
Awaiting to hear on the same.
Thanks,
Samir Kurry
Thanks Samir for your comment.
I actually have a blogpost about Deployment Pipelines on my waiting list.
So, stay tuned for that.
Hi Soheil,
Just correct me if I am wrong, the Power BI deployment pipelines are enough to manage the deployment for different environments viz, DEV, UAT and PROD or do we still need Azure DevOps deployment pipeline to be set? Wonder what that would do?
Thanks,
Samir Kurry
Hi Samir,
Thanks for you question.
As you correctly pointed out, Power BI deployment pipelines are a feature that allows you to manage the development lifecycle of your Power BI reports and datasets across different environments, such as development, testing and production. With Power BI deployment pipelines, you can create copies of your content in different workspaces, apply changes and validations, and promote or deploy your content to the next stage.
Power BI integration with Azure DevOps also offers these functionalities and more. In this approach you can perform tasks such as source control, versioning, testing, security scanning, code reviewing and more which are not really an option in Power BI’s deployment pipeline. Another reason that one may take Azure DevOps integration over the Power BI deployment pipeline is the ability to use version control and source control capabilities on your local machine and not in the service.
So, to answer your question, Power BI deployment pipelines are enough to manage the deployment for different environments, but if you need refined controls over your code and more advanced source control then integrating with DevOps is a good option.
I have a blog about Power BI deployment pipeline and Azure DevOps integration comparison in my backlog.
So stay tunned for that.
Cheers.
Hi,
Great article, very clearly details out the information, and steps required to get there.
We’ve currently got around 70-90 reports in the PBI service, which use Import method for data. Since the PBIX’ contain the data using Import method, we avoid keeping copies of the PBIX saved down because of risk of data theft.
I have used Powershell Cmdlet before to download PBIX’ en masse, but looking for an option to download them all as PBIP’s so that we can start moving to GIT integration. Alternatively we’d have to open each PBIX, save as, set PBIP and do the next one etc.
Thanks in advance for any help.
Thanks
Hi Rich,
Thank you for reaching out and sharing your thoughts.
It’s great to hear about your experience with Power BI and your consideration of Git integration.
I completely understand your concern regarding the risk of data theft when downloading PBIX files from the Fabric Service. Security is indeed a top priority, and your cautious approach is commendable. It’s crucial to safeguard sensitive data, and your approach aligns with best practices.
Regarding your point about downloading PBIP files for Git integration, I want to clarify that, currently, Git integration itself won’t automatically generate PBIP files during the process. As you rightly mentioned, the typical workflow involves manually opening each PBIX file, saving as PBIP, and proceeding to the next one. While this might seem a bit manual, it ensures a deliberate and controlled transition.
If you have any further questions or need assistance with your Git integration journey, feel free to ask. We’re here to help!
Cheers.