Power BI is growing very quickly and there are tons of fantastic features added to it during the past few months. So there are lots of Power BI subjects we can talk about these days. In this article I want to represent a new feature added to Power BI Service which is “Publish to Web”. Publish to Web is basically putting Power BI reports in an iFrame. So now we can combine Power BI and iFrame together and embed Power BI reports into a web page to share data insights to the Internet. Keep in mind that the data we publish to web will be available to anyone on the Internet. So we really need to make sure we do NOT share any confidential information and we have the rights to share that information.
Note: Publish to web feature is in Preview so it is available for all users with no costs during the preview. So you don’t need to have a Pro account to be able to use this feature for now.
I also explain how to embed a rich media content in your Power BI Dashboard.
Note: Publish to web and embedding a rich media content to your dashboard are different features available in Power BI Service.
Power BI Publish to Web
Publishing a Power BI report to web not only creates a link that you can send in email, but also creates HTML iFrame you can put in your blog or website. I would like to remind you again that the “Publish to Web” feature is only available in Power BI Service so don’t get confused by looking for such a feature in Power BI Desktop.
Enabling Power BI Publish to Web
To enable Power BI Publish to Web follow the steps below:
- Login to your Power BI Service
- Open a desired report
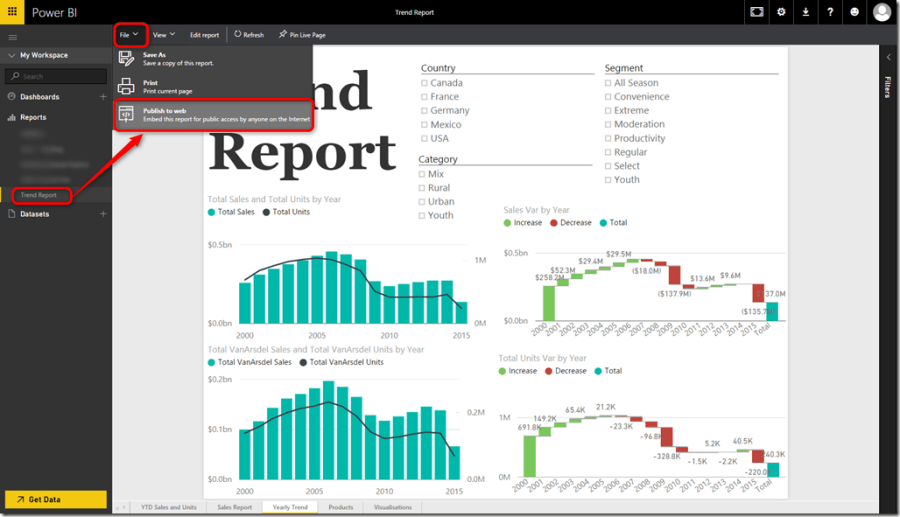
- Click “File” menu then “Publish to Web”
- Click “Create embed code”
- Read the warning carefully then if you feel comfortable with that click “Publish”
- We created the embed code successfully
- You can change the iFrame size by selecting a desired size from the list
- OR you can justify the iFrame size in your website or blog
- To share the report with others you can simply email the link
- To make sure the link works just copy and paste it to your web browser and it should open the report
- The report is fully functional so you can use filters and so on
- To embed the report in your website or blog just copy and paste the HTML core created
- As I mentioned before you can adjust the iFrame size as you like
- Now you’re good to publish the report to your website or blog
Managing Embed Codes
To manage your embed codes follow the steps below:
- Click “Settings” icon (
- Click “Manage Embed Codes”
- You can see all associated reports in the list
- Click ellipsis button to delete the embed code or get the existing code
Adding a Web Content to your Power BI Dashboard
In this section I explain how to embed web contents into your Power BI Dashboard. As a matter of fact a web content could be anything from very simple HTML codes, iFrame or any other sort of embed code. But, what is really exciting is that we can now put an iFrame generated from another Power BI Report. Consider you are working with an enterprise that has lots of separated sub-companies. Each company has its own data analytics division. You have to create a top level dashboard showing the overall enterprise performance. With the Publish to Web feature now all you need to do is to get an iFrame code from other sub-companies and put them nicely in a Power BI dashboard. Lets see how we can do that.
-
After logging into your Power BI account open a desired dashboard or create a new dashboard
-
Paste the embed code in the “Embed code” section
-
All done!

Soheil,
Is it possible to embed the PowerBI dashboard the same way we embed a PowerBI report on a SharePoint site? The best solution I have found till now is to put a hyperlinks to the PowerBI dashboard page, we would like to embed it.
Thank you,
Regards,
Cyril
Hi Cyril,
Welcome to BIInsight.com.
Unfortunately there is no practical way for that at the moment.
You can vote for it here.
Cheers
How can I embed phone layout of my report? When I open my report which is in iframe of my website, rendered as desktop version, on my phone. I want to see phone layout version if I open the report from my phone.
Hi Ozan,
Welcome to BIInsight.com.
That’s a very good question indeed.
Unfortunately I have never done that, so I’ll reply back with the answer when I find it out.
Cheers.
Hi, were you able to find a solution ? Thanks.
is there anyway that we can disable print option for power BI report
Hi Reddy,
Welcome to BIInsight.com.
Yes, you certainly can if you are a Power BI admin.
Navigate to the Admin Portal in Power BI Service, under the Tenant Settings, find and disable the Print dashboards and reports setting.
Hopefully that helps.
Cheers.